Expand/Collapse radgrid in jquery

So after reading dozens and dozens of forums I finally just gave up on figuring out the obscure way to deal with hierarchy in a Telerik RadGrid. The classes are easy to find and the expand sections are just Submit buttons. So some super simple JQuery allows you to manipulate them quite easily. You can expand a few rows in your own grid and run these in Console.

$('.rgMasterTable tr td.rgExpandCol input.rgCollapse[type=submit]').click();

$('.rgMasterTable tr td.rgExpandCol input.rgExpand[type=submit').click();

NOTE: (There is more logic required to iterate (and do a wait) for each if there are multiple expansions).

Getting Started with Microsoft Big Data, Hive & HDInsight Jump Start

This is the first of a three-Jump Start series tailored for architects and seasoned developers interested in a demo-heavy learning experience introducing Microsoft’s Big Data solution set. Microsoft Technical Evangelist Saptak Sen and Vice President of Consulting Services, Advaiya Inc Bill Ramos will start with setting up and loading data into Windows Azure storage and a Windows Azure HDInsight cluster. After covering Windows Azure Data Management concepts (e.g., SQL Machines, SQL Databases, Tables, Blobs), they will demonstrate using Hive to query Hadoop data using HiveQL commands

I didn’t get the link till late but it will be available for streaming in about a week

https://www.microsoftvirtualacademy.com/liveevents/exploring-microsoft-big-data-jump-start

Hadoop SDK and Tutorials for Microsoft .NET Developers

Hortonworks is offering training but there are now even more tutorials available for HDInsight.

On codeplex there is a Microsoft .Net SDK for Hadoop kit for available.

Github has a series of 5 labs covering C#, JavaScript and F# coding.

HDInsight

Finally got around to installing HDInsight on a new Windows Server 2012 environment on my laptop. In case you have not been following the news HDInsight is Microsoft’s answer to the Big Data problem. It has been in preview mode online through http://www.hadooponazure.com and available for download on the SQL Server site. This last week Microsoft announced that the HadoopOnAzure site was going to be formally added to the offerings available on Azure.

image

Brief History

HDInsight is not a 100% Microsoft product and is a partnership between Microsoft and HortonWorks. The underlying code is still Java based but Microsoft has added a Javascript console and some extensions to allow programming in .Net languages.

Current training for HDInsight is available through the HortonWorks website. As soon as I find MS training I will post a link.

Introduction To Windows Azure HDInsight Service

image

http://channel9.msdn.com/Series/Getting-started-with-Windows-Azure-HDInsight-Service/Introduction-To-Windows-Azure-HDInsight-Service

Installation

Installation of HDInsight is extremely easy through the Web Platform Installer. Just search for Hadoop or HDInsight. (Technet install guide)

image

After a complete installation you will have the following links on your desktop

image

Getting Started with HDInsight

Rather than repost here is a 5 part series just released on HDInsight.

http://blogs.msdn.com/b/windowsazure/archive/2013/03/19/getting-started-with-hdinsight.aspx

KnowledgeLake Capture Profile Administration

One of the issues I ran into with creating an automated deployment of Capture Clients to a large number of field users was importing profiles. It seemed that until every single user that has access to the machine had successfully logged in and created a Windows User Profile that the KL Capture Profile Administration Utility would not provide a user with a profile.

The blurred sections are the user accounts.
The top one has all the test user accounts I have been working with. And I want all the accounts to get the Scan(SIT2) account. Even accounts that have not logged into the machine.

image

To resolve this is issue right-click on Scan(SIT2) and select Set As Default.

image

Now all the profiles will have this profile available to them. The Default profile is also highlighted with a checkbox.

image

This functionality is also available when you run the KnowledgeLake Capture Client the first time and create a profile. There is a checkbox in the wizard that allows you to set a profile as default.

Configure FAST Search Server for KnowledgeLake Imaging 4.4

After a correct installation of FAST Search Server there are a few items to validate before moving forward (FAST Installation guide Please follow this guide and ensure that you have).
Before beginning the KnowledgeLake Imaging installation check that the Web Application is set to use the FAST Query SSA. To check this start at Central Administration -> Application Management -> Service Application Associations. Then select the Web Application that you want to use FAST Search on.
Rather than leaving the dropdown at default change it to custom. This will allow you to select only the exact Applications you want running on your Web Application.
clip_image002
Then select all the checkboxes appropriate for the Web Application but make sure to NOT check Search Service Application. And be sure to check FAST Query SSA. Additionally, click the ‘set as default’ link to set FAST as the default Search Service Application Proxy.
clip_image004
At this point it is important to note that the “normal” instructions for setting up Imaging 4.4.2 will be loosely followed. I will attempt to make this as thorough as I can to follow. Additionally the two Service Applications created for FAST will be referenced as either FAST Connect or FAST Query from now on. After the installation of FAST there are some pre-installation tasks for KnowledgeLake Imaging.
· From SharePoint Central Administration go to Manage Service Applications.
  • Click on FAST Query SSA
  • Click on FAST Search Administration
  • This will probably be a new screen to users not familiar with FAST.
clip_image006
  • Click on Managed Properties
  • Click on Add Managed Property
Now the top section should look very familiar. So following the Imaging Admin Guide enter the Property name owsContentType
clip_image008
In the next section Type you can leave the default values
clip_image010
In the next section you need to add a mapping to he ows_ContentType. This is almost identical to the normal SharePoint Managed Properties mapping but has the ability to add more than one selected crawl properties at one time.
clip_image012
Click OK
Leave the Sort Property unchecked
On Query Property make sure to check the box. This insures that the KnowledgeLake Search Center can provide the property in the results column or as a search property.
Leave the Refiner property unchecked
On the Full-text Index Mapping section….It is very important to select a number between 1-7 as a priority mapping. If you leave the default value at zero it will not populate the Index. Considering this is a fairly important property in the KnowledgeLake Search Center I suggest using the priority of 6.
clip_image014
Then click OK
In the next section of the KnowledgeLake Imaging Admin guide it requires you to visit the Categories section and make a change to the SharePoint category so that all newly discovered properties are automatically added. This is set by default in FAST
clip_image016
Run a full crawl with the FAST Content Service Application.
After the crawl is complete run the following PowerShell in the Microsoft FAST PowerShell

Get-FASTSearchMetadataFullTextIndexMapping

The result should provide this in the resulting feed
clip_image018

SharePoint 2013 External Content Types in Visual Studio–OData

The documentation is a bit limited currently but wanted to share how to add an External Content Type in Visual Studio.

Starting with a standard SharePoint 2013 App Project

image

Setup your App settings (SharePoint-hosted for local)

image

Right-click the project and select Add. There is an extra menu-item called Content Types for an External Data Source.

image

Put in the OData service URL

image

Here I am using a free feed from the Azure Datamarket.

Here are the available data entities from this service

image

After selecting the Event data entity the new list is setup as an External Content Type.

image

SharePoint Tenant Creation with Change Request tracking in System Center Service Manager

One of the more troublesome issues in SharePoint is creating new site collections when not logged into Central Administration. Because this task always requires someone with farm admin access it tends to not get high priority in a normal administrators daily role. Additionally, Governance teams should validate when site collections are being created and monitored correctly versus creating a sub site. By combining the ease of submitting a request in a SharePoint list and the Best Practice of tracking changes in Systems Center Service Manager with Opalis there is a smooth, expedient, tracked manor to provision site collections. By combining SharePoint and SCSM a decision can be made as to where the approval workflow reside. For this demonstration the site collection will be automatically provisioned and a Change Request will automatically be created inside Systems Center Service Manager. Then the SharePoint list item that originally kicked off the process will be updated to show the request has been completed. Finally the SCSM ticket will be closed automatically so there is a record of the change.

Requirements

· Custom SharePoint List that includes

§ Title column to store the type of request. The default value is defined as Site Collection Request.

§ Site Collection URL column to the preferred url of the site.

§ Primary Site Collection Administrator column.

§ A Request column that is a calculated field that combines the Title and the Site Collection URL to create a unique name for reporting in SharePoint and in SCSM.

§ A status column that is a dropdown with the values of New & Complete available.

§ A customized All Items view that filters out all entries that do not have a status of New.

· Systems Center Service Manager Integration Pack for Opalis

· Systems Center Service Manager configured

· Execute PowerShell Script Integration Pack

· Global Variables

Start by configuring the SharePoint Integration Pack in Opalis. Under Options Select Microsoft SharePoint (see Figure 9-50). Then add in an a configuration to point to the new SharePoint list defined in the requirements (see Figure 9-51).

clip_image002

Figure 9-50 Navigating to the Microsoft Configuration section in Opalis.

clip_image004

Figure 9-51 Defining another configuration point.

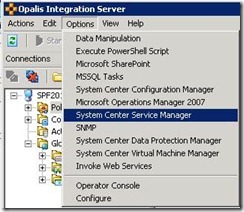
Then add a configuration for the installed System Center Service Manager. Start by selecting Options and then select System Center Service Manager (see Figure 9-52). Then create entries to connect to the System Center instance. Finally, validate the settings by clicking the Test Connection (see Figure 9-52).
clip_image006

Figure 9-52 Navigating to the System Center Service Manager Configuration section in Opalis.

clip_image008

Figure 9-53 A defined configuration to connect to System Center.

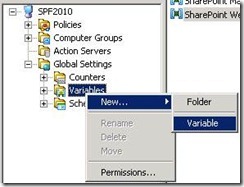
Then expand Global Settings and right-click Variables select New then select Variable (see Figure 9-54). Rather than pass the variables from SharePoint the Global Variable functionality in Opalis will be used in case these values are required again. Create two variables (see Figure 9-55).
clip_image010

Figure 9-54 Creating a new Global Variable.

clip_image012

Figure 9-55 Defined Global Variables

Then create a New Policy inside the Opalis Client and add-in the following objects

· Microsoft SharePoint

o Monitor List Item

o Update List Item

· Execute PowerShell Script

o Execute PS Script

· System Center Service Manager

o Create Change with Template

o Get Activity

o Update Activity

The end result should end up looking like Figure 9-56.

clip_image014

Figure 9-56 A Policy setup in Opalis.

Configuration of the Policy objects

Monitor List Item

Under Configuration select the name by choosing the name of the configured SharePoint list for creating a site collection request (see Figure 9-57).

clip_image016

Figure 9-57 Monitor List Item object properties.

Create Change with Template

Under the Properties section set the Connection to the name of the System Center instance defined earlier. Then for Class choose Change Request and for Template choose Standard Change Request. The Fields need to be added to so click on Select optional Fields and choose Status, Impact, Title and Actual start date. After hitting OK individually set the values in these items (see Figure 9-58).

· Status = New

· Impact = Minor

clip_image018

Figure 9-58 Create Change with Template properties.

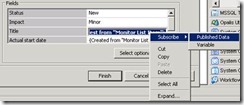
To set the Title field by right-clicking in the Title field, select Subscribe and select Published Data (see Figure 9-59). The only available option (after connecting the two objects) is Monitor list Item. Scroll through the columns and select the Request column from SharePoint. Actual start date is defined the same way but the value is from Created.
clip_image020

Figure 9-59 Setting the Title field by subscribing to Published Data.

Execute PS Script

Under the Input Properties right-click the PS Script 01 and select Expand. There are five variables in the PowerShell script and just a simple concatenation of the variables. Finally the script creates a new site collection with the url and primary site collection administrator passed in as dynamic variables (see Figure 9-60).

· #webUrl -This is subscribed to the Global Variable SharePoint Web Application URL

· $managedPath - This is subscribed to the Global Variable SharePoint Managed Path

· $scUrl - This is subscribed to from the Monitor List Item object.

· $ownerAlias – This is subscribed to from the Monitor List Item object

· $completeUrl – This concatenates $webUrl, $managedPath, and $scUrl

clip_image022

Figure 9-60 PS Script 1 properties to create a dynamic site collection

Update List Item

The objective of the Update List Item object in this scenario is to demonstrate automated completion of the operation without the complexity of creating a SharePoint workflow. This object takes in the ID of the list item from Monitor List Item and updates the Status column to Complete (see Figure 9-61).

Open the Configuration section of this object and select the SharePoint configuration that points the Site Collection Request list. There are two properties that are setup in this object.

· ID – This is subscribed to from the Monitor List Item

· Status – This is set to the value of Complete

clip_image024

Figure 9-61 Update List Item Properties.

Get Activity

The Get Activity object needs the Connection to point to the configured Systems Center in Opalis. The Activity Class is set to Manual Activity and Source Object Guid is subscribed to from the Create Change with Template object (see Figure 9-62).

clip_image026

Figure 9-62 Get Activity properties.

Update Activity

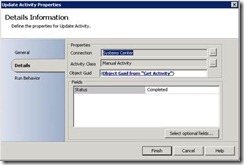
The final object in the policy updates SCSM and changes the status of the ticket to Completed. The Properties Connection needs to be set to the configured System Center in Opalis. The Activity Class is set to Manual Activity and the Object Guid is subscribed to from Get Activity. The only field utilized is the Status field and it is set to Completed (see Figure 9-63).
clip_image028

Figure 9-63 Update Activity properties connected to the System Center connection, set to a Manual Activity and receiving the Object Guid from Get Activity.

Testing

Place the Policy in Policy Test Console and click the Run button. The Monitor List Item object will be waiting for a new SharePoint list item to be created (see Figure 9-64). After the new item is detected a ticket is created (see Figure 9-65).

clip_image030

Figure 9-64 Site Collection provisioning Policy in debug mode.

clip_image032

Figure 9-65 Site collection ticket in System Center Service Manager showing a status of completed.

Solving real world SharePoint problems with Opalis

Monitoring Content DB Size and provisioning a new Content DB

By taking the previous example a little farther it would be possible to monitor the content databases of a SharePoint environment to prevent content databases from becoming too large. This is one of the main advantages of Opalis is that it assists in maintaining Best Practices in the enterprise (see Figure 9-49).

Requirements

· Initial Global scheduler to analyze the environment on a daily basis

· PowerShell script that finds all the web application url’s, then finds the content databases that make up the site collections

· Database query that passes in the content database name and returns the size

· Logic that defines the maximum size of the content database

· Logic that calculates 90% and 70% and provides alerts

· PowerShell script that automatically provisions a new content database to the appropriate web application when the database size hits 70%. The content database should initially be offline to prevent use initially.

· At 90% of the defined Best Practice size use a PowerShell script that automatically put the initial content database in offline mode and puts the new database in Ready mode.

clip_image002

Figure 9-49 Policy to monitor content databases in SharePoint.

SharePoint Integration Kit

Opalis has built-in Integration Packs and the ability to utilized custom Integration Packs. An Integration Pack has been created for SharePoint and is available at http://opalis.codeplex.com. After installing the Integration Pack using the steps provided previously it is necessary to configure the SharePoint Integration Pack. Start by selection Options from the top menu and select Microsoft SharePoint (see Figure 9-40). After selecting that option the Configuration Window opens (see Figure 9-41). Click Add to enter the specifics about what SharePoint environment that this configuration should connect to. Every configuration can be different logins, different lists or document libraries, or different web url’s (see Figure 9-42).

clip_image002

Figure 9-40 Microsoft SharePoint configuration selection for the Microsoft SharePoint Integration Pack.

clip_image004

Figure 9-41 Microsoft SharePoint configurations defined in Opalis.

clip_image006

Figure 9-42 An individual Microsoft SharePoint configuration for Opalis.

Database sizes into a SharePoint List

Over the years I have received many requests from different levels of management and normally the more difficult ones have the biggest priority. I recall an issue with another group’s database that was consistently causing issues because they were getting too large and were not being monitored correctly. So the question came up as to how do we get all the databases and their sizes provided to management on a daily basis? Normally this requires some manual intervention in Excel or providing access to the administration tools in the datacenter or the DBA’s tools. Providing ODBC access in Excel or Access has the potential to expose the username and password. What if on a daily basis, or even hourly, Opalis queried all the databases and populated a SharePoint list that could be provided to anyone? This would remove any security concerns and alleviates another request.

Start by creating a new Policy and drag a Query Database object from the utilities section. Then enter a simple query to get the top 100 databases from the master databases and get the size into Megabytes (see Figure 9-42). Finally, define the connection and security credentials.

/** Select the databases from the master database**/

SELECT TOP (100) name, (size*8)/1024 SizeMB

FROM sys.master_files

clip_image008

Figure 9-42 Query Database object properties displaying the SQL statement.

Now drag a Create List Item object from the Microsoft SharePoint section of objects and drag a link from the Query Database object to the Create List Item object (see Figure 9-43).

clip_image010

Figure 9-43 Connecting objects in Opalis.

Double-click the Create List Item object to open the properties dialog. Under Configuration set the name to SharePoint Database List. This queries SharePoint and provides the Title field. Click Optional Properties to add-in the Size MB field and select to move to the Selected column (see Figure 9-44).

clip_image012

Figure 9-44 Adding properties available to a SharePoint Create List Item.

To configure the field mapping it takes a little more configuring so since it known that the SQL Query is going to return two fields separated by a semicolon it is possible to use the following function (see Figure 9-45).

clip_image014

Figure 9-45 Data manipulation function inside Opalis.

The function passes in the familiar Full line as a string with fields separated by ‘;’ and passes in a delimiter and requests the first value from the pair. The field for the Size MB is similar but requests the second value. The final result looks like Figure 9-46.

clip_image016

Figure 9-46 Create List Item properties showing two fields populated.

From this point it is possible to run a Test on this policy and populate the database. Figure 9-47 shows the Policy running. Figure 9-48 shows the SharePoint list being populated.

clip_image018

Figure 9-47 Policy populating a SharePoint list from the Policy Testing Console.

clip_image020

Figure 9-48 SharePoint list populated with values from Opalis.

Creating a basic Policy

clip_image002

Figure 9-28 The Opalis Integration Server Interface.

By opening the Opalis Integration Server and right-clicking on the Policies tree select Policy to create a new Policy (see Figure 9-29). This will create a policy in the main section of the interface (see Figure 9-28 B). For the scenario with the new Policy we need a process to run on a schedule. Expand the section called Global Settings and right-click Schedule and select New Schedule (See Figure 9-30). For this SharePoint specific example the Schedule name is Content Databases (see Figure 9-31). By updating the Detail section this will check on the size of the content databases in a SharePoint environment once a day (see Figure 9-32).

clip_image004

Figure 9-29 Creating a new Policy in Opalis.

clip_image006

Figure 9-30 Creating a new Schedule in Opalis.

clip_image008

Figure 9-31 General Scheduling information in Opalis

clip_image010

Figure 9-32 Setting a Schedule in Opalis.

Testing

Opalis has the ability to run tests on the Policies created. The following example has a Custom Start object that runs a Database Query (see Figure 9-33). In the Task bar select Test to perform a test on the Policy. This brings up a new application window that allows the user Run, set Breakpoints and debug objects (see Figure 9-34).

clip_image002[4]

Figure 9-33 Simple Policy with two connected objects.

clip_image004[4]

Figure 9-34 Policy Testing Console

In the Testing Console if an individual object is selected the properties are displayed in the Design Time Properties window (see Figure 9-35). There is a simple SQL statement that runs a built in stored procedure that returns all the databases on the SQL Database that the Query Database object is setup to connect to. By clicking the Run button the two objects will execute and provide a log of their actions, properties, and return values (if available) (see Figure 9-36).

clip_image006[4]

Figure 9-35 Design Time Properties for the Query Database object.

clip_image008[4]

Figure 9-36 Policy Testing Console displaying the populated logs after running a policy.

The Query Database stores all its returned values in the Full lines as a string with fields separated by a ‘;’. By highlighting that line in the logs the interface adds a ellipsis button. But clicking on the ellipsis button a small modal window provides the data returned but the query (see Figure 9-37). While the results are interesting the name of the modal is very important. The data is designated as Published Data. So when objects are connected in the Policy and there is a desire to interact with the data, this is the actual data that is published from the Query Database object that was defined.

clip_image010[4]

Figure 9-37 Published Data Browser displaying the results of the Query Database object.

By exiting the Test client and returning to the Integration Server Client we can show how it is possible process this Published Data some more. By selecting and adding a Run .Net Script object to the Policy the capacity to run C#, Jscript, PowerShell or VB.Net code is available (see Figure 9-38).

clip_image012

Figure 9-38 The Run .Net Script Object displaying the types of script it can run.

After selecting PowerShell as the script type it is necessary to right-click in the Script section to open a context menu. This allows the ability to select the Published Data from the Query Database object (or from a Global Variable). Select Published Data and then the field Full line as string with fields separated by ‘;’ the script section will display a hyperlinked section of code that can be assigned to a variable in PowerShell. By adding a few more lines of PowerShell for processing and putting the same Policy in the Test Console again it is possible to see the first value passed in from the Query Database object into the PowerShell (when set as a breakpoint) script (see Figure 9-39).

clip_image014

Figure 9-39 Policy Testing Console in debug mode with a breakpoint hit at the Run .Net Script object.